Cobbler安装部署
Centos环境下
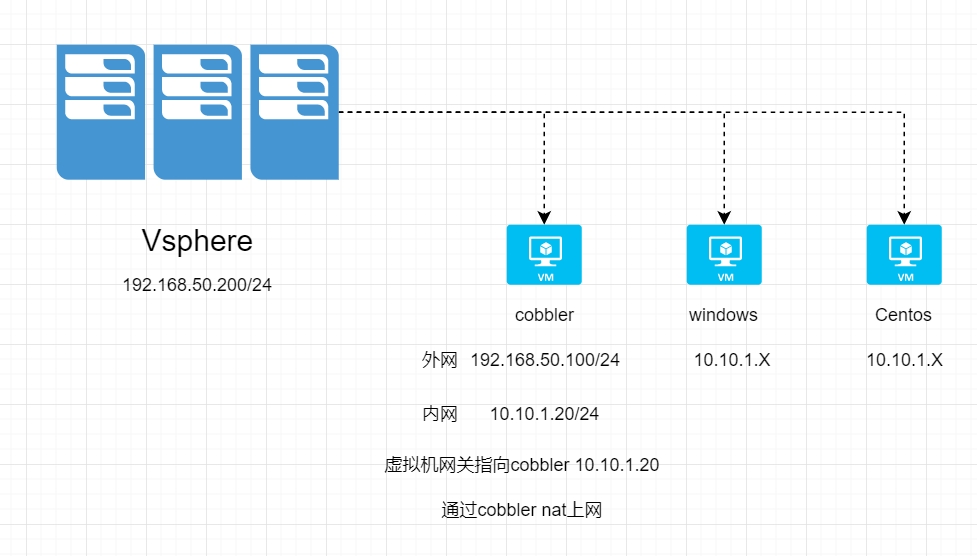
架构

系统初始化配置
关闭selinux
setenforce 0
1
sed -i 's#SELINUX=enforcing#SELINUX=permissive#g' /etc/sysconfig/selinux
关闭防火墙
1
2
3
systemctl stop firewalld
systemctl disable firewalld安装阿里云epel源
1
wget -O /etc/yum.repos.d/epel.repo http://mirrors.aliyun.com/repo/epel-7.repo
更新软件包
1
yum update -y
部署cobbler
安装cobbler和其组件
1
yum install -y httpd dhcp tftp cobbler cobbler-web pykickstart xinetd
启动服务和开机自启动
1
2
3
4
5
6
systemctl start httpd
systemctl start cobblerd
systemctl start xinetd
systemctl enable httpd
systemctl enable cobblerd
systemctl enable xinetd配置cobbler
- 检查配置
1
cobbler check
1
2
3
4
5
6
7
8
9
10
11
12
13
14
15
16
17
The following are potential configuration items that you may want to fix:
1 : The 'server' field in /etc/cobbler/settings must be set to something other than localhost, or kickstarting features will not work.
This should be a resolvable hostname or IP for the boot server as reachable by all machines that will use it.
2 : For PXE to be functional, the 'next_server' field in /etc/cobbler/settings must be set to something other than 127.0.0.1,
and should match the IP of the boot server on the PXE network.
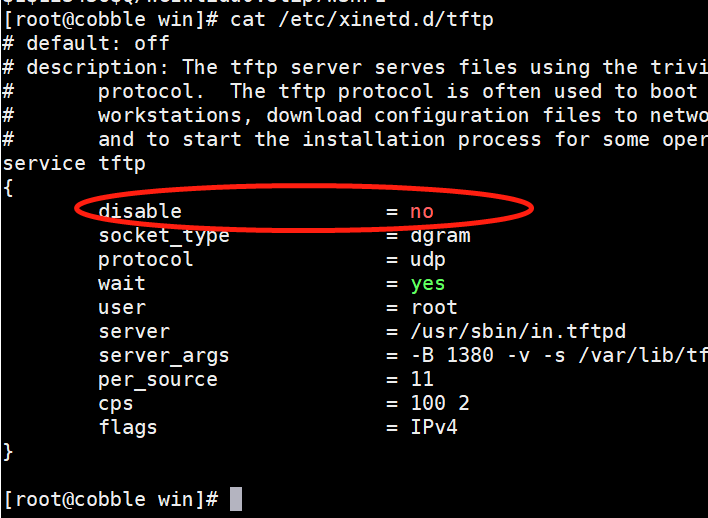
3 : change 'disable' to 'no' in /etc/xinetd.d/tftp
4 : some network boot-loaders are missing from /var/lib/cobbler/loaders, you may run 'cobbler get-loaders' to download them, or,
if you only want to handle x86/x86_64 netbooting, you may ensure that you have installed a *recent* version of the syslinux package installed and can ignore this message entirely.
Files in this directory, should you want to support all architectures, should include pxelinux.0, menu.c32, elilo.efi,
and yaboot. The 'cobbler get-loaders' command is the easiest way to resolve these requirements.
5 : enable and start rsyncd.service with systemctl
6 : debmirror package is not installed, it will be required to manage debian deployments and repositories
7 : The default password used by the sample templates for newly installed machines (default_password_crypted in /etc/cobbler/settings) is still set to 'cobbler' and should be changed,
try: "openssl passwd -1 -salt 'random-phrase-here' 'your-password-here'" to generate new one
8 : fencing tools were not found, and are required to use the (optional) power management features.
install cman or fence-agents to use them生成默认密码(用于登录后面我们创建的linux虚拟机,root密码)
1
openssl passwd -1 -salt '123456' 'test1234'
test1234才是root密码

修改配置文件
1
vi /etc/cobbler/settings
主要修改下面几个参数
1
2
3
4
5
6
7
8
9
server: 192.168.50.100
next_server: 192.168.50.100
default_password_crypted: "$1$123456$Q/WGzwlidu0V8tip7w3hP1"
#设置cobbler来管理dhcp
manage_dhcp: 1
#设置cobbler来管理tftp
manage_tftpd: 1
#设置cobbler支持yum源安装
yum_post_install_mirror: 1
修改tftp配置

加载cobbler一下文件
1
cobbler get-loaders
配置rsync服务
1
2
systemctl enable rsync
systemctl start rsync应用配置并重新检查
1
systemctl restart cobblerd
1
cobbler check
1
2
3
4
5
6
The following are potential configuration items that you may want to fix:
1 : debmirror package is not installed, it will be required to manage debian deployments and repositories
2 : fencing tools were not found, and are required to use the (optional) power management features. install cman or fence-agents to use them
Restart cobblerd and then run 'cobbler sync' to apply changes.
配置dhcpd
- 配置dhcp服务(我这边两张网卡只有一张用于dhcp服务,一张用于上外网)
1
vi /etc/cobbler/dhcp.template
1
2
3
4
5
6
7
8
9
subnet 10.10.1.0 netmask 255.255.255.0 {
option routers 10.10.1.20;
option domain-name-servers 10.10.1.20;
option subnet-mask 255.255.255.0;
range dynamic-bootp 10.10.1.10 10.10.1.254;
default-lease-time 21600;
max-lease-time 43200;
next-server $next_server;
}- 多网卡的情况下,需要指定具有相同内网的网卡来做dhcp
eno33559296 就是我用来和虚拟机通信的网卡
1
cp /usr/lib/systemd/system/dhcpd.service /etc/systemd/system/
1
vi /etc/systemd/system/dhcpd.service
1
2
3
4
5
6
7
8
9
10
11
12
13
[Unit]
Description=DHCPv4 Server Daemon
Documentation=man:dhcpd(8) man:dhcpd.conf(5)
Wants=network-online.target
After=network-online.target
After=time-sync.target
[Service]
Type=notify
ExecStart=/usr/sbin/dhcpd -f -cf /etc/dhcp/dhcpd.conf -user dhcpd -group dhcpd --no-pid eno33559296
[Install]
WantedBy=multi-user.target重启cobbler 同步配置
1
2
systemctl restart cobblerd
cobbler sync
导入镜像
- 先挂载centos镜像到服务器,然后再导入
1
mount /dev/cdrom /mnt/
1
cobbler import --name=CentOS7-x86_64 --path=/mnt/ --arch=x86_64
制作centos kickstart文件
可以参考我的github上面ks文件
制作snippets系统初始化脚本
参考系统标准化使用的脚本
配置开机启动菜单标签
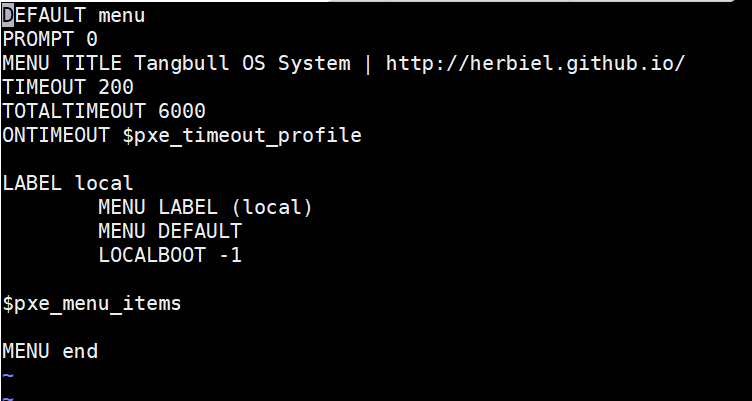
1
vi /etc/cobbler/pxe/pxedefault.template

创建虚拟机测试